How To Clean A Coffee Pot – Simple Cleaning Methods
To clean your coffee pot effectively, use equal parts water and white vinegar to descale. Run a brew cycle halfway, pause for an hour, then finish and rinse twice with plain water.
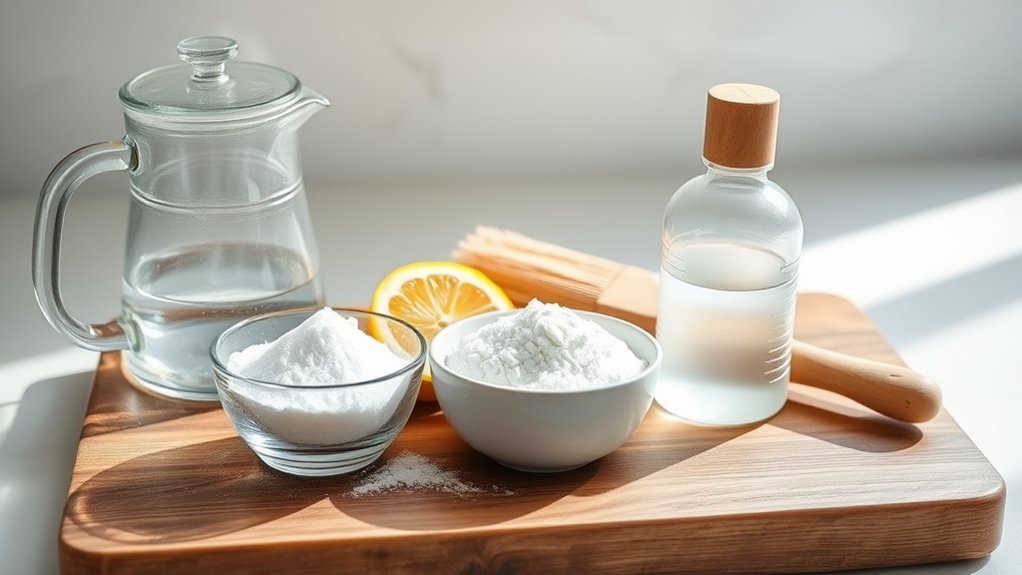
For freshness, try citric acid or lemon juice mixed with baking soda for gentle scrubbing. Wash removable parts with hot, soapy water daily, and wipe the exterior with a damp cloth.
Regular deep cleaning every 2-3 months keeps your coffee tasting great and protects your machine. You can explore more tips to maintain peak performance.
Why Regular Cleaning Matters for Your Coffee Pot

Although it might seem tedious, cleaning your coffee pot regularly is essential to maintaining the quality of your brew. Over time, mineral deposits and coffee oils build up, dulling the coffee taste and causing unpleasant bitterness. You’ll also prevent mold and bacteria growth, safeguarding your health and ensuring each cup tastes fresh.
Consistent cleaning keeps your appliance running efficiently, which means faster brewing times and stable temperature control. By removing stains and residue promptly, you preserve the pot’s appearance and greatly extend appliance longevity. Neglecting this maintenance compromises not only flavor but also the machine’s performance and lifespan.
Staying on top of cleaning ensures your coffee pot delivers the best coffee taste every time, while protecting your investment for years to come. So, it’s definitely worth the little effort to keep things fresh and working smoothly!
What You’ll Need to Clean a Coffee Pot Effectively
To clean a coffee pot effectively, you’ll need a few essential supplies that target both mineral buildup and coffee residue. First, gather water and white vinegar to create a descaling solution. This is especially important if your water hardness is high.
Hot, soapy water and a sponge work best for scrubbing removable parts like the carafe and filter basket. The filter basket often houses the coffee filter, so it’s important to clean it well.
Use a damp dish towel to wipe the exterior and a dry towel to finish drying.
If your coffee pot has dishwasher-safe components, you can use a dishwasher for convenience.
For stubborn stains inside the pot, try adding rice or baking soda during cleaning.
Having these tools ready guarantees thorough maintenance, preserving your coffee pot’s performance and your brew’s flavor.
How to Clean With Vinegar

When you mix equal parts water and white vinegar to fill your coffee pot’s water chamber, you create a powerful descaling solution that targets mineral buildup effectively. Run a brew cycle, then pause halfway to let the mixture sit for an hour. This loosens stubborn limescale.
Finish the cycle, discard the solution, and run two cycles with plain water to rinse thoroughly. This method prevents white film buildup, preserving your machine’s performance and ensuring ideal brewing temperature. Maintaining clean internals means your coffee flavor remains pure and untainted.
| Step | Action |
|---|---|
| 1 | Fill chamber with equal parts water and vinegar |
| 2 | Brew, pause halfway, let sit for 1 hour |
| 3 | Complete brew, discard, then rinse twice |
How to Clean With Citric Acid for a Fresh Smell
You can easily remove mineral buildup and bring back a fresh smell by cleaning your coffee pot with citric acid. Just mix two tablespoons of citric acid with four cups of water. Then, run a brew cycle with that mixture.
Afterwards, make sure to rinse thoroughly to get rid of any leftover residue.
This method isn’t only eco-friendly and effective, but it also leaves your pot smelling clean—without any harsh chemical odors.
Citric Acid Cleaning Benefits
Although many cleaning agents promise to refresh your coffee pot, few match the effectiveness of citric acid. This natural acid excels at dissolving stubborn mineral buildup and limescale deposits that accumulate inside your machine.
By mixing two tablespoons of citric acid with four cups of water, you create a potent solution that not only cleans but deodorizes your coffee pot thoroughly.
Regular cleaning with citric acid prevents mineral interference, which can dull your coffee flavor over time.
Unlike harsh chemical descalers, citric acid is eco-friendly and safe, making it a smart choice for routine maintenance.
Using it consistently guarantees your coffee pot performs at its best, preserving the rich taste you expect with every brew.
Fresh Smell Restoration
Citric acid doesn’t just tackle mineral buildup; it also excels at eliminating stubborn odors that can linger in your coffee pot. To restore a fresh smell, mix two tablespoons of citric acid with four cups of water and run a full brew cycle.
This process targets coffee stain removal and mineral deposit prevention simultaneously, neutralizing mold, mildew, and stale coffee odors.
After brewing, discard the solution and rinse the pot thoroughly with distilled water to remove any residue. If odors persist, just repeat the cycle until your coffee pot smells clean and fresh.
Using citric acid offers an eco-friendly, natural alternative to harsh chemicals.
It’s a great way to keep your coffee pot odor-free while maintaining its cleanliness and longevity. Plus, it’s simple and effective!
Using a Dishwasher Tablet to Clean Your Coffee Pot
When tackling stubborn coffee stains and mineral buildup, using a dishwasher tablet offers a powerful and convenient solution. Start by slicing open a dishwasher tablet and placing it inside your empty coffee carafe.
Then, fill the carafe with hot water, making sure the water temperature is high enough to dissolve the tablet efficiently.
Let the solution sit overnight. This gives it enough time to break down coffee grounds residue and mineral deposits that cling to your pot.
In the morning, rinse the carafe thoroughly with warm water several times to remove any lingering residue.
This method not only eliminates tough stains but also keeps your coffee pot looking fresh and clean.
Try to do this regularly to prevent stubborn buildup and keep your coffee pot spotless without any harsh scrubbing.
It’s an easy way to save time and effort!
Tips for Safely Using Commercial Descalers
Because commercial descalers contain strong acids, you need to handle them with care to protect both yourself and your coffee pot. Always follow the manufacturer’s instructions to guarantee effective coffee stain removal without damaging internal parts.
Wear gloves and work in a well-ventilated area to keep things safe while you’re descaling. After you finish, make sure to rinse thoroughly to get rid of any chemical residues that could affect the flavor.
| Tip | Reason | Action |
|---|---|---|
| Follow instructions | Prevent damage | Use recommended descaler amount |
| Wear gloves | Protect skin and eyes | Use protective gloves |
| Rinse thoroughly | Remove residual chemicals | Flush with clean water |
| Avoid mixing products | Prevent harmful reactions | Use one descaler only |
How to Use Lemon Juice and Baking Soda to Clean
You’ll start by mixing equal parts lemon juice and water. This combo works great to dissolve mineral deposits and neutralize odors in your coffee pot.
Then, add a tablespoon of baking soda to some warm water. Swirl it gently inside the pot and let it sit for about 15-20 minutes. This helps tackle any stubborn stains and buildup.
Finally, grab a soft sponge and give the interior a good scrub. Rinse it thoroughly to make sure no residue is left behind.
This way, your pot stays fresh and clean without using any harsh chemicals.
Lemon Juice Benefits
Three simple ingredients: lemon juice, baking soda, and water form a powerful, natural cleaning solution that effectively tackles mineral deposits, grease, and coffee stains in your coffee pot. Lemon juice’s natural acidity breaks down stubborn mineral buildup and coffee stains. This helps restore your pot’s shine without harsh chemicals.
When combined with baking soda, it creates a fizzy reaction that lifts away grease and residue safely.
Here’s why lemon juice benefits your coffee pot cleaning routine:
- It descales mineral buildup, preventing damage and prolonging pot lifespan.
- It eliminates odors, leaving your coffee pot smelling fresh and inviting.
- It’s gentle yet effective on most coffee pot materials, so you don’t have to worry about surface damage.
Using lemon juice regularly guarantees a clean, fresh-tasting brew every time. You’ll notice the difference right away!
Baking Soda Application
How exactly can you harness the combined power of baking soda and lemon juice to refresh your coffee pot? Start by mixing one part baking soda with four parts warm water. This gentle abrasive tackles coffee mold and mineral deposits caused by water hardness.
Add a few drops of lemon juice to boost cleaning strength and leave a fresh scent. Swirl the mixture inside your pot, focusing on stained or build-up areas, then let it sit for 15-20 minutes.
For stubborn stains, create a paste with baking soda and lemon juice, apply it directly, and gently scrub.
Finally, rinse thoroughly with warm water to eliminate residue and odors. This method effectively combats coffee mold and mineral buildup, restoring your pot’s cleanliness without harsh chemicals.
Cleaning Process Steps
Although cleaning a coffee pot might seem straightforward, following a precise process guarantees the best results when using lemon juice and baking soda. This method excels at coffee stain removal and mineral buildup prevention, keeping your pot fresh and efficient.
Here’s how to do it:
- Mix equal parts lemon juice and water, pour into the pot, and let it sit for 15-20 minutes to dissolve deposits and stains.
- Add a tablespoon of baking soda to warm water, scrub gently with a sponge to eliminate residue and odors.
- Rinse thoroughly with plain water to remove any leftover acidity or residues.
Repeat monthly to maintain a spotless pot and enhance your coffee’s taste every time. It’s an easy routine that really makes a difference!
Simple Daily Cleaning Tips to Keep Your Coffee Pot Fresh
Because coffee oils and residue can quickly build up, you should rinse your coffee pot with warm water immediately after each use to prevent stains from setting.
Rinse your coffee pot with warm water right after use to stop stains from forming.
Wash the carafe daily with warm, soapy water using a sponge or dishcloth to remove leftover oils that affect taste. Don’t forget to clean the spout and lid with a soft brush to eliminate hidden residue.
Wipe down the exterior with a damp cloth to maintain a spotless appearance.
Regularly inspect and clean the filter basket, as trapped grounds can degrade freshness.
Proper coffee storage and maintaining an ideal brewing temperature also help preserve flavor and prevent buildup.
Following these simple daily cleaning habits ensures your coffee pot stays fresh, extending its lifespan and delivering consistently great coffee. It’s an easy routine that really makes a difference!
How Often You Should Deep Clean Your Coffee Maker
You should deep clean your coffee maker every two to three months to prevent mineral buildup and keep it performing at its best. If you use hard water or brew several cups daily, increase deep cleaning to monthly.
Regularly check for limescale deposits or a white film, which signal it’s time for descaling techniques. This guarantees efficient heating and better coffee flavor.
Follow these guidelines to maintain your coffee maker:
- Use effective coffee stain removal methods to avoid residue buildup.
- Apply proper descaling techniques with vinegar or commercial solutions.
- Clean after every full filter pack or large coffee batch for ideal results.
Consistent deep cleaning prolongs your machine’s life and guarantees the freshest, richest brew every time.
Just a little bit of care goes a long way!
How to Clean Coffee Maker Parts: Carafe, Filter, and More
You should rinse the carafe thoroughly after each use to prevent stains and remove any coffee residue. It’s a simple step that really makes a difference.
Also, don’t forget to clean the filter basket regularly. Using a sponge or brush helps get rid of oils and mineral buildup that can affect the flavor.
Keeping these parts spotless not only ensures your coffee maker runs smoothly but also means your brews will taste fresh every time.
Cleaning The Carafe
Although it’s tempting to leave the carafe as is after brewing, rinsing it immediately prevents coffee stains from setting and becoming stubborn. Proper carafe maintenance not only keeps your coffee tasting fresh but also extends the life of your equipment. Follow these expert steps:
- Rinse the carafe with warm water immediately after use to stop coffee stains from hardening.
- Clean thoroughly using warm, soapy water and a soft brush or sponge, scrubbing inside and out.
- For tough stains, soak the carafe for 15-30 minutes in a mixture of water and vinegar or baking soda, then rinse well.
If it’s dishwasher-safe, you can also run the carafe through a cycle. Just make sure to dry it completely afterward to prevent mold and mildew buildup.
Easy, right? Keeping your carafe clean is definitely worth the effort!
Maintaining Filter Basket
When cleaning your coffee maker, start by removing the filter basket and discarding any used coffee grounds to prevent buildup. Proper filter maintenance is vital for peak brewing and flavor.
Wash the basket with warm, soapy water, using a sponge or brush to remove stubborn oils and coffee grounds residue. Rinse thoroughly to guarantee no soap or particles remain, as these can impact taste.
For tough stains or buildup, soak the filter basket in a vinegar-and-water solution for 15-20 minutes before scrubbing. After cleaning, dry the basket completely or let it air-dry to prevent mold and odors.
Regularly maintaining your filter basket not only extends its life but also keeps your coffee tasting fresh and clean. It’s a simple step that really makes a difference every time you brew.
How to Rinse and Reassemble Your Coffee Maker After Cleaning
After thoroughly cleaning your coffee maker, make sure to rinse all removable parts, such as the carafe and filter basket, with warm water to get rid of any leftover cleaning solution. Rinse well to avoid any residue that might affect flavor or safety.
Next, dry all the components completely so you don’t get mold or mildew buildup.
Then, reassemble carefully by following these steps:
- Place the filter basket securely in its slot, making sure it fits snugly.
- Insert the carafe correctly under the brew basket so it catches coffee without spills.
- Double-check that the water chamber and any other removable parts are positioned properly to prevent leaks.
Finally, wipe down the exterior with a damp cloth to remove any cleaning traces. Doing all this helps your coffee maker work perfectly on your next brew.
Troubleshooting Common Coffee Pot Cleaning Issues
If you notice your coffee maker brewing slowly or producing weak coffee, mineral deposits might be the culprit. These deposits can block water flow and reduce efficiency. Water mineral buildup, especially from hard water, can clog the filter basket and water lines.
So, regular descaling with vinegar or a commercial agent is essential. For stubborn coffee stains inside the carafe, try scrubbing with baking soda or even rice. This helps break down residue effectively.
A white film or cloudy residue usually means mineral deposits or mold. Running a cleaning cycle with vinegar or citric acid can get rid of it.
If you’re dealing with persistent odors or mold, it’s often due to moisture and bacteria buildup. A thorough cleaning using vinegar or specialized tablets will help keep your coffee pot fresh and hygienic.
Frequently Asked Questions
Can I Use Bleach to Clean My Coffee Pot Safely?
You shouldn’t use bleach to clean your coffee pot because of bleach safety risks and the potential for leftover residue from cleaning chemicals.
Instead, go for vinegar or commercial descalers. They clean just as effectively without harming your pot or putting your health at risk.
Trust me, these options are a lot safer and still get the job done well!
How Do I Remove Hard Water Stains From My Coffee Maker?
You might expect stain removal to be tough, but tackling hard water buildup is simpler than you think.
Mix baking soda and water into a paste, scrub gently, then rinse thoroughly to restore your coffee maker’s shine and function.
It’s pretty straightforward once you get started! Just a little effort goes a long way.
What Is the Best Way to Clean a Single-Serve Coffee Machine?
You should perform coffee machine descaling regularly using vinegar or citric acid. Clean removable parts with warm, soapy water, and wipe internal components carefully.
This routine guarantees effective coffee pot maintenance and keeps your machine brewing at its best. It’s pretty simple once you get into the habit!
Can Coffee Pot Cleaning Methods Damage the Machine’s Warranty?
About 40% of warranty claims get denied because of improper maintenance.
You can void your warranty if you use harsh cleaning chemicals that manufacturers don’t recommend. So, it’s always best to stick to approved solutions to keep your coffee machine protected.
Taking care of your machine the right way helps avoid any warranty headaches down the line.
Is It Necessary to Clean the Coffee Grinder Separately?
Yes, you should clean your coffee grinder separately. Proper coffee grinder maintenance and grinder cleaning techniques prevent oil buildup and guarantee consistent grind size.
This also protects the flavor, helping you brew the best coffee every time. Plus, regular cleaning stops mold or residue from building up, which is a big win for your health and taste buds.
Conclusion
So, you want that perfect cup of coffee, but your pot looks like it brewed a science experiment? Regular cleaning isn’t just for show. It keeps your coffee tasting fresh and your machine happy.
With vinegar, citric acid, or even a dishwasher tablet, you’ve got expert tools ready. Just don’t wait until your coffee pot doubles as a mold habitat.
Clean it, rinse it, and enjoy brewing like a pro every morning.